Enterprise Forms: Pluggable Behaviors
Introduction
Enterprise Forms supports pluggable behaviors. So, custom form behaviors can be plugged into the built-in extension points. The CMS form editor also supports custom UI plugins to configure pluggable behaviors.
Enterprise Forms provides a number of ready-to-use pluggable behaviors:
- Submission confirmation
- Submission counter
- Actual store counter
- Form introduction
- Mail form data
- Store form data
- After process (confirmation text)
If the above behaviors are not sufficient for your needs, read on to learn how to implement your own custom behaviors!
Extension points
The abstract base form component class com.onehippo.cms7.eforms.hst.components.EformComponent has several extension points. Behavior can be plugged in to those extension points by implementing one of the following interfaces.
com.onehippo.cms7.eforms.hst.api.DoBeforeRenderBehavior
Behaviors implementing DoBeforeRenderBehavior are invoked before rendering the form component. Implement DoBeforeRenderBehavior if you need to prepare additional data for rendering.
com.onehippo.cms7.eforms.hst.api.ValidationBehavior
Implement ValidationBehavior to add additional validation logic. ValidationBehaviors are invoked after the form's own validation operation is performed. So even if the form's own validation operation is successful, you can plug in a ValidationBehavior which can perform further checks and raise validation errors.
com.onehippo.cms7.eforms.hst.api.OnValidationErrorBehavior
Implement OnValidationErrorBehavior to add additional functionality in case of unsuccessful form validation. OnValidationErrorBehaviors are invoked after the form's own onValidationError method is called.
com.onehippo.cms7.eforms.hst.api.OnValidationSuccessBehavior
Implement OnValidationSuccessBehavior to add additional functionality in case of successful form validation. OnValidationSuccessBehaviors are invoked after the form's own onValidationSuccess method is performed.
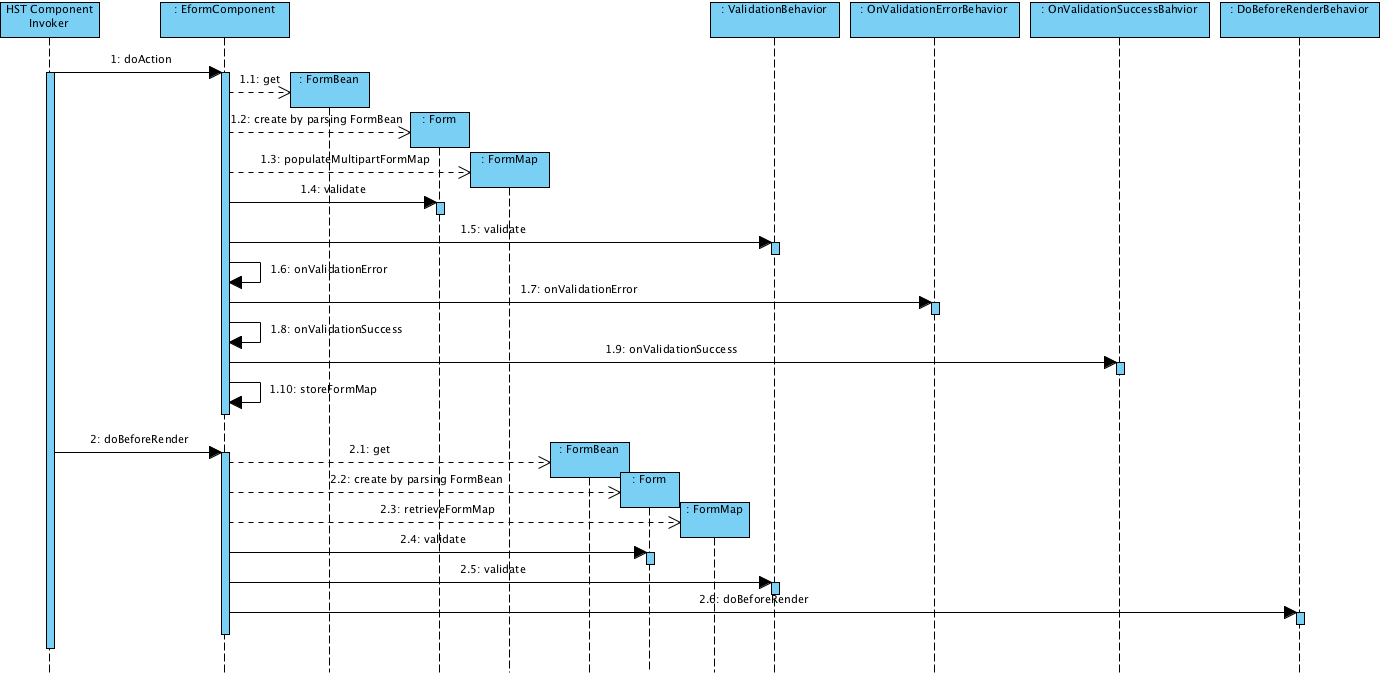
Here's a sequence diagram showing how HST-2 Container, EformComponent and custom pluggable Behavior components interact with each other.

Download the above diagram at full size
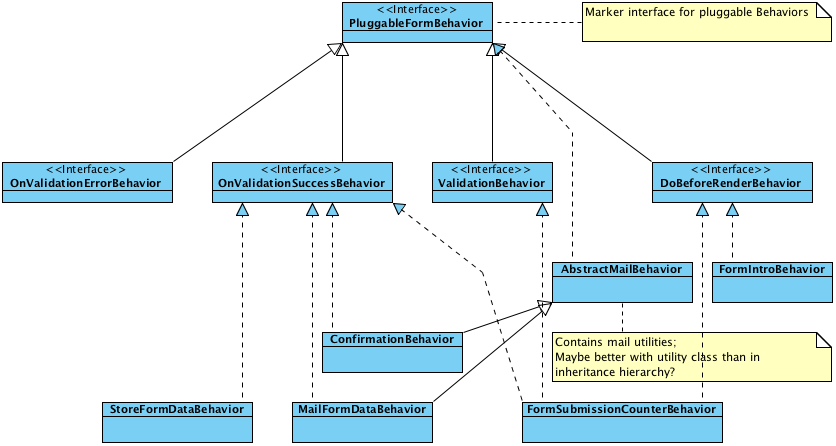
Also, the following is a class diagram showing all the pluggable Behavior interface and currently existing implementations.

Download the above diagram at full size
Adding behaviors to a form
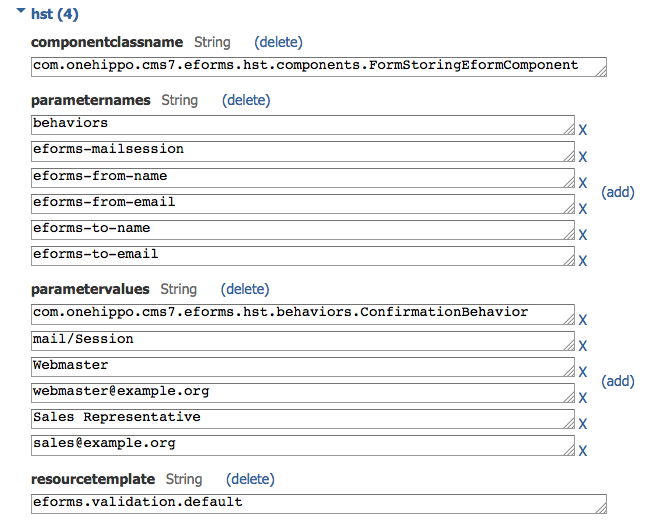
Pluggable behaviors can be added to a form in the HST component configuration. Any component extending com.onehippo.cms7.eforms.hst.components.EformComponent accepts a component parameter behaviors containing a comma separated list of fully qualified class names of behaviors.
Below is a screenshot of (part of) a form component configuration. The component class com.onehippo.cms7.eforms.hst.components.FormStoringEformComponent extends com.onehippo.cms7.eforms.hst.components.EformComponent, so it supports pluggable behaviors. The parameter behaviors has the value com.onehippo.cms7.eforms.hst.behaviors.ConfirmationBehavior, which means the Submission Confirmation behavior is plugged in to this form component.

Configuring pluggable behaviors
The CMS form editor provides an extension point to plug in additional UI elements so your behavior can be configured by users. Any CMS RenderPlugin will do, but for convenience an abstract plugin com.onehippo.cms7.eforms.cms.extensions.AbstractFormExtensionPlugin is available, which provides basic markup in the Enterprise Forms style, and a getFormDocument() convenience method to obtain the JcrNodeModel representing the form document.
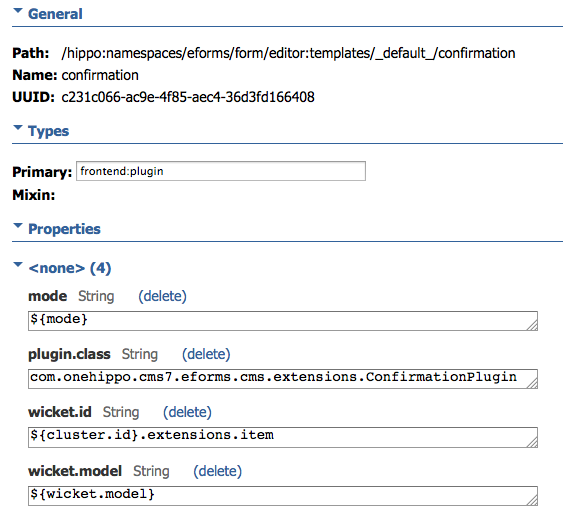
You can either add your plugin to the global form content type in the "eforms" namespace (/hippo:namespaces/eforms/form), or you can create your own custom form content type and add your plugin there. In either case, simply add a node of type frontend:plugin under /hippo:namespaces/[your_namespace]/[your_content_type]/editor:templates/_default_. Set the plugin.class property to the fully qualified class name of your plugin. Also add the properties mode, wicket.id and wicket.model as in the screenshot below. This way the plugin will be added at the extension point, and provided with the relevant data.

Implementation tips
In general, whenever implementing any of the above behaviors, it's always a good idea to check whether form data has been processed or not. This can be done by checking the generated form field eforms_process_done which is set to "true" after all form processing has finished. Use the constant EformComponent.ATTRIBUTE_PROCESS_DONE to retrieve this field from the FormMap.

