Use your organization's Identity Provider for authentication
Introduction
Goal
Integrate your organization's Identity Provider with Bloomreach Cloud to enable Single Sign-On (SSO).
Background
By default, Bloomreach Cloud users and their roles are managed on the Users tab in Bloomreach Cloud. To optimize security, compliance, and user experience, Bloomreach Cloud supports Single Sign-On (SSO) through integration with an organization's existing Identity Provider (IdP).
Bloomreach Cloud SSO relies on OAuth 2 and SAML as an authorization mechanisms that decouple authentication, authorization, and resource access. Bloomreach Cloud does not get access to the user list stored in the Identity Provider.
This mechanism allows you to select users within your IdP that will have access to Bloomreach Cloud and have full control over authentication (set password requirements, Multi-Factor Authentication (MFA), etc.).
Prerequisites
- It is mandatory to have an Identity Provider in place.
- If Multi-Factor Authentication (MFA) is required, the existing IdP must support MFA.
- CI scripts that deploy to Bloomreach Cloud will have to be modified.
Enable SSO
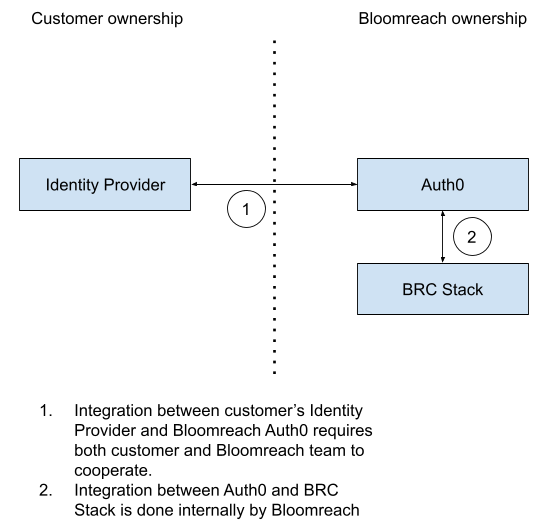
Enabling SSO in Bloomreach Cloud requires integration between your IdP and Bloomreach Auth0.
To initiate the integration process, please create a support ticket. The Bloomreach Cloud team will work with you to enable SSO using your IdP. The exact process will differ for each IdP. An example for Azure Active Directory is provided in the next section.

CI impact
Bloomreach Cloud provides the /v3/authn/access_token endpoint to authenticate users and CI scripts. Enabling SSO means that authentication will happen within your Identity Provider and the access_token endpoint will be disabled.
There are two approaches - either CI scripts authenticate via your Identity Provider, or via Bloomreach Auth0.
Authentication via Identity Provider
In this approach, the Identity Provider has to be configured to allow "script" accounts. The exact steps depend on the IdP implementation.
During each run, the CI scripts have to:
- Using the pre-configured "script" account, authenticate via Identity Provider and get an authentication token.
- Call the Auth0 API to get an authorization token, in exchange for the authentication token.
- Pass the authorization token as a header along with every Bloomreach Cloud API request.
This approach provides flexibility - you control the "script" accounts in the Identity Provider, own the credentials and set the credentials rotation policies.
The downside is the complexity - the CI scripts will need to implement OAuth2 or SAML protocols, depending on the setup.
Authenticate via Auth0
This scheme is a simple single-step process - CI script directly calls Auth0 API and retrieves an authorization token.
Bloomreach Cloud support team will provide an Auth0 API endpoint along with an Auth0 API key.
The only downside of this approach is that rotation of the API key requires contactin Bloomreach Cloud support.
Example: Azure Active Directory
This section provides an example SSO integration with Azure Active Directory via SAML.
As a customer, you are responsible for setting things up on the Azure end. Bloomreach will provide required information such as the connection name and Auth0 domain.
The following instructions are adapted from https://community.auth0.com/t/setting-up-azure-ad-as-saml-enterprise-connection/87829.
Azure setup:
- Open portal.azure.com.
- Go to Azure Active Directory > Enterprise applications > + New Application.
- Click + Create your own application.
- Enter "BloomreachCloud" under the What’s the name of your app?
- Under What are you looking to do with your application? select Integrate any other application you don’t find in the gallery (Non-gallery) and click Create.
- Click Single sign-on in the left pane and under Select a single sign-on method select SAML.
- In the 1. Basic SAML Configuration box, click Edit.
- Under Identifier (Entity ID) set up the identifier using the value provided by Bloomreach.
- Set the Reply URL (Assertion Consumer Service URL) to the value provided by Bloomreach.
- Click Save.
- In the 3. SAML Signing Certificate box click Download next to Certificate (Base64).
- In the 4. Set up BloomreachCloud box copy the Login URL. It will look like https://login.microsoftonline.com/xxx/saml2.
At this point, you will need to provide the Login URL and the downloaded certificate to Bloomreach so we can set up things on the Auth0 end.
Once Bloomreach informs you the Auth0 setup is complete, you can test the connnection by navigating to Dashboard > Authentication > Enterprise > SAML, click three dots next to the connection you just created and select Try.
Frequently Asked Questions
Which Identity Providers does Bloomreach Cloud support?
Technically, Bloomreach Cloud can integrate with any IdP but Bloomreach is unable to test all available IdPs to confirm compatibility. Please contact Bloomreach Cloud support to inquire about your IdP.
Does Bloomreach Cloud get access to our Identity Provider's user list?
No, Bloomreach Cloud does not get access to the user list. The OAuth 2 authorization mechanism decouples authentication, authorization, and resource access.
How long is a login through SSO valid?
By default, the authorization token is valid for 24 hours. Please contact Bloomreach Cloud support if you wish to change this.
Are changes to a user's access in the Identity Provider immediately picked up by Bloomreach Cloud?
Removing a user from the IdP will impact only subsequent re-login attempts. Any existing, issued token, is valid to use with the Bloomreach Cloud API until it expires.
Can the Auth0 token be used with the Bloomreach Cloud API?
Yes, the token can be copied from the user menu in Mission Control and used with Bloomreach Cloud API until it expires (default is 24 hours after creation).
Is the token invalidated when logging out from Mission Control?
No, when logging out, Mission Control "forgets" the token but the token itself remains valid until it expires (default is 24 hours after creation).

