Develop a Custom Page Tool Tutorial
A page tool is an external web application rendered aside of a page shown in the Experience manager. It extends the base functionality of Bloomreach Experience Manager with third-party functionality.
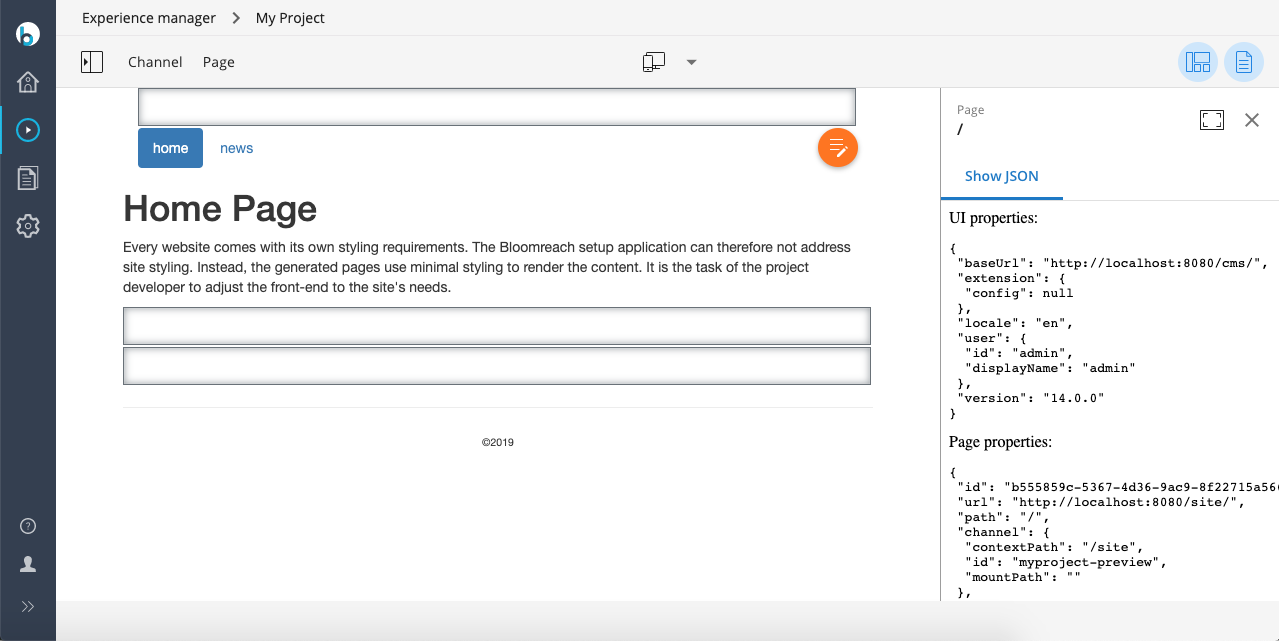
In this tutorial we are going to add a page tool that renders the JSON data provided by the Experience manager. The page tool will be named "Show JSON". In the end it will look like this:

Page tool
The show-json page tool will be a separate project based on Webpack. We'll assume NodeJS and NPM are already installed. First create a new project:
mkdir show-json && cd show-json
npm init -y
npm install --save-dev webpack webpack-cli webpack-dev-server
Add a file called index.html in the root folder:
<!doctype html>
<html>
  <head>
    <title>Show JSON</title>
  </head>
  <body>
    <script src="main.js"></script>
  </body>
</html>
Create a source folder for JavaScript code:
mkdir src
Create the JavaScript source file src/index.js. It will generate some test output for now:
document.write('Hi!');
Next, edit the package.json file and change the "scripts" entry in there to:
  "scripts": {
    "start": "webpack-dev-server --port 9000 --mode development --watch-content-base"
  },
Start the Webpack development server using the 'start' command we've just added:
npm start
The "show json" extension can now be viewed separately at http://localhost:9000.
Bloomreach Experience Manager Project
Follow the Get Started steps to create a new archetype project. Install some Essentials features to get a working site. For example, install the "News" feature.
Next we're going to integrate the "show json" extension. Open http://localhost:8080/cms/console and navigate to /hippo:configuration/hippo:frontend/cms/ui-extensions and add one node:
/hippo:configuration/hippo:frontend/cms/ui-extensions/showJson:
  jcr:primaryType: frontend:uiExtension
  frontend:displayName: Show JSON
  frontend:extensionPoint: channel.page.tools
  frontend:url: http://localhost:9000
Login to the CMS as admin or editor. Navigate to Experience manager > My Project > Page > Tools. The Show JSON tab should now show "Hi!".
Show JSON data
Instead of "Hi" we want to see the JSON data provided by the Experience manager. Let's go back to the code base of the "Show JSON" extension. We'll create our extension using only plain HTML and JavaScript, but any framework may be used.
First install the BloomReach JavaScript client library:
npm install @bloomreach/ui-extension
Next, change the index.html file so it contains two <pre> tags that will show the data:
<!doctype html>
<html>
  <body>
    UI properties:
    <pre id="ui"></pre>

    Page properties:
    <pre id="page"></pre>

    <button id="refreshChannel">Refresh Channel</button>
    <button id="refreshPage">Refresh Page</button>

    <script src="main.js"></script>
  </body>
</html>
The Webpack dev server will pick up the changes automatically and reload the extension in the Experience manager. Nice!
Change the src/index.js file to:
import UiExtension from "@bloomreach/ui-extension";

document.addEventListener('DOMContentLoaded', () => {
  UiExtension.register().then((ui) => {
    showUiProperties(ui);

    ui.channel.page.get().then(showPageProperties);
    ui.channel.page.on('navigate', showPageProperties);

    onClick('refreshChannel', () => ui.channel.refresh());
    onClick('refreshPage', () => ui.channel.page.refresh());
  });
});

function showUiProperties(ui) {
  const properties = pluck(ui, ['baseUrl', 'extension', 'locale', 'timeZone', 'user', 'version']);
  showJson(properties, 'ui');
}

function showPageProperties(page) {
  showJson(page, 'page');
}

function showJson(json, id) {
  document.getElementById(id).innerHTML = JSON.stringify(json, null, ' ');
}

function onClick(id, listener) {
  document.getElementById(id).addEventListener('click', listener);
}

function pluck(object, properties) {
  return Object.keys(object)
    .filter(key => properties.includes(key))
    .reduce((result, key) => {
      result[key] = object[key];
      return result;
    }, {});
}
The code waits for the DOMContentLoaded event to ensure the DOM is ready for changes. Next it calls UiExtension.register() to register the extension with the CMS. The register method returns a Promise that resolves with a ui object.
The ui object contains several properties, which are shown using the showUiProperties() method. It uses a custom pluck() to extract some properties, and displays those as JSON in one of the <pre> tags.
The extension.config property will be set to the string configured in the JCR property /hippo:configuration/hippo:frontend/cms/ui-extensions/showJson/frontend:config. When that JCR property is not set the JSON property will be null. It's up to the extension how to use/interpret the config property (e.g. parse it as JSON).
The timeZone property is only available when the time zone selector is enabled in the login screen.
The ui object also returns data about the current page via ui.channel.page.get() and shows it in the other <pre> tag.
Our page tool also registers a 'navigate' listener. To see this listener in action, navigate to another page by browsing the site in the Experience manager. The 'navigate' listener will be called for every new page and make our page tool show the new page data.
Last, the extension shows two buttons that refresh the channel and page, respectively. Refreshing the page is probably noticeable. Refreshing the channel may not seem to do much at first, though. To see it in action, use an admin user that views the page tools and a concurrent editor user that changes the channel (e.g. adds a component). When the admin clicks Refresh Channel the yellow changes indicator will appear in the top-left corner. Also the site map in the left side panel will sync.

