Bloomreach Experience Manager on Kubernetes 102
Kenan Salic
2021-09-16
After a very frequently read tutorial on Bloomreach Experience Manager on Kubernetes 101 we now present BrXM on K8s - 102.
The world of Kubernetes and the Bloomreach Experience Manager is changing and rather rapidly. The 101 guide from 2019 already seems to be outdated and it’s time to release a new and better one. While some topics are still valid and worth the read, others have changed significantly. In the 102 we will guide you through the following:
-
Updates wrt the 101 guide
-
Start up faster with existing indexes
-
Scaling & Repository Maintenance
All material, scripts and more used in this blog article are available from a github repository here: https://github.com/bloomreach/brxm-k8s-102/tree/master/k8s
Also an elaborate written article about the technical details:
https://documentation.bloomreach.com/14/library/deployment/on-premise-kubernetes-setup.html
While creating this blog the follow technology versions were used:
-
Docker version: 20.10.7
-
Minikube version: v1.21.0
-
Kubectl client version: v1.21.2
-
Kubectl server version: v1.20.7
-
Experience Manager version: v14.6.0
-
npm: 6.14.12 and yarn version v1.22.10
-
HELM version: v3.6.2
1. Updates wrt the 101 guide
This section will get your cluster up and running with the most basic of Bloomreach Experience Manager
Minikube,
We still run minikube the same way we did in the previous guide:
minikube start --memory 8192 --cpus 2 startWeb server and load balancer
Differently from the 101: the nginx ingress controller can be enabled directly with minikube with the following guide:
https://kubernetes.io/docs/tasks/access-application-cluster/ingress-minikube/
minikube addons enable ingress
Database
Differently from the 101: previously we initialized a helm chart for the mysql database. The previous helm chart is deprecated and all has moved to a new chart: bitnami/mysql. Run the database with the following command when helm is initialized:
helm install my-mysql --set auth.username=cms,auth.database=brxm,image.tag=5.7.34 bitnami/mysql
K8s Objects
Architecture and prerequisites
Before we deep dive into yaml and kubernetes objects we will need to know what the intended situation and architecture will look like:
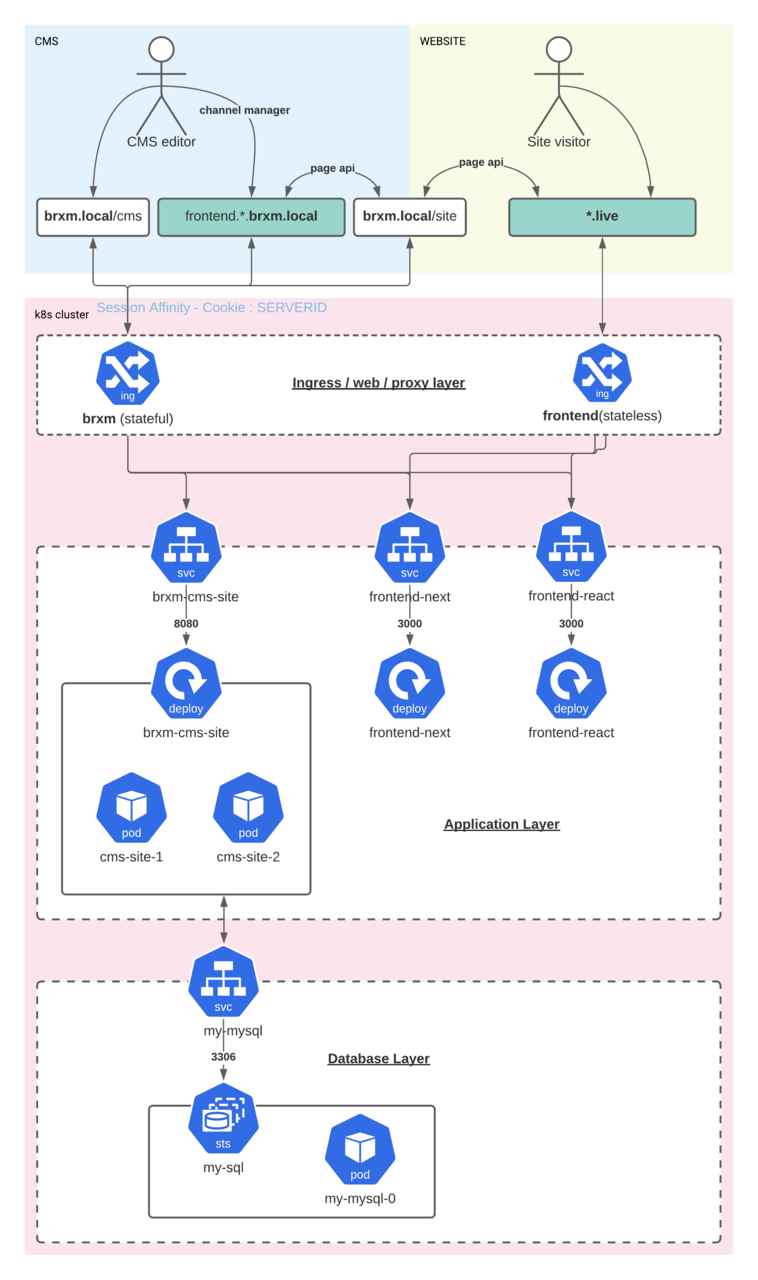
“Backend”:
-
We will run the CMS on ://brxm.local/cms
-
We will run the Page Delivery API required for the frontend on ://brxm.local/site
We will need to make the right adjustments to our local hosts file to facilitate this:
<minikube-ip> brxm.local
To make this very simple and fast I’ve already pre-created a brxm docker image which is configured to work with this host:
https://hub.docker.com/r/bloomreach/xm-example-k8s-project
image: bloomreach/xm-example-k8s-project
You will see this image is used in the brxm-cms-site deployment section here below.
For this demo we are using 2 frontend applications consuming the Page Delivery API:
-
We will run a CSR React frontend application on frontend.react.brxm.local and on ://react.live
-
We will run a SSR NextJs frontend application on frontend.next.brxm.local and on ://next.live
The reason why we will make the frontend available on 2 different hosts is that for the channel manager integration it is most easiest to have the frontend running on the same host (frontend.*.brxm.local) as the backend!
We will need to make the right adjustments to our local hosts file to facilitate this:
<minikube-ip> frontend.react.brxm.local
<minikube-ip> frontend.next.brxm.local

<minikube-ip> react.live
<minikube-ip> next.live
To make this very simple and fast we’ve already pre-created docker images
https://hub.docker.com/r/bloomreach/xm-react-example
https://hub.docker.com/r/bloomreach/xm-next-example
image: bloomreach/xm-react-example

image: bloomreach/xm-next-example
You will see these images are used in the frontend-next and frontend-react deployments section here below.
ConfigMap
Used to store the mysql variables from the helm chart. These are used in the brxm-cms-site deployment and other deployments and pods to connect to the mysql database
https://github.com/bloomreach/brxm-k8s-102/blob/master/k8s/configmap-my-mysql-variables.yamlService
https://github.com/bloomreach/brxm-k8s-102/blob/master/k8s/services.yamlIngress’
Stateful brxm ingress:
It’s important that the stateful ingress should have session affinity set on cookie and the cookie name set to SERVERID (this is required for scaling in section 3)
https://github.com/bloomreach/brxm-k8s-102/blob/master/k8s/ingress-brxm.yamlSnippet:
    nginx.ingress.kubernetes.io/affinity: "cookie"
    nginx.ingress.kubernetes.io/affinity-mode: "persistent"
    nginx.ingress.kubernetes.io/session-cookie-max-age: "1860"
    nginx.ingress.kubernetes.io/session-cookie-expires: "1860"
    nginx.ingress.kubernetes.io/session-cookie-name: "SERVERID"
    # our internal io domains should have / cookie path always to work with Channel manager
    nginx.ingress.kubernetes.io/session-cookie-path: /
    kubernetes.io/ingress.class: "nginx"
Stateless frontend ingress:
Plain ingress for stateless frontend application.
https://github.com/bloomreach/brxm-k8s-102/blob/master/k8s/ingress-frontend.yamlDeployments
https://github.com/bloomreach/brxm-k8s-102/blob/master/k8s/deployment-brxm.yaml

https://github.com/bloomreach/brxm-k8s-102/blob/master/k8s/deployments-frontend.yaml
2. Start up faster with existing indexes
When we scale up and add additional pods to the brxm-cms-site deployment e.g.
kubectl scale deployment/brxm-cms-site --replicas=3
This will run an extra brxm-cms-site pod to the deployment (total of 3 pods in the cluster). Depending on the size of the repository this might take a very long time to start up to build up the indexes. In most cases it could even outrun the liveness and readiness check and end up in a continuous loop.
To solve this problem Bloomreach has added support for starting up containers with existing indexes. This will completely bypass the build up of the indexes and start the application within minutes.
How this works:
-
In the supplied docker image there is an environment variable for existing indexes
# Provide LUCENE_INDEX_FILE_PATH to initialize the local lucene index with a stored copy
src/main/docker/Dockerfile
If we have an existing index then we can configure this variable to point to the copy
-
Export index from an existing pod by using the index export add-on
The index export add-on features an endpoint which allows you to export an existing index as a zip file which can be used for a new pod/container
For this we can create a simple cron job:
https://github.com/bloomreach/brxm-k8s-102/blob/master/k8s/cronjob-index-export.yaml
The above cron job will download the index from the endpoint:
http://{hostname}/cms/ws/indexexport
from an existing environment and save it as index.zip on a shared storage.
In minikube you can mount the volume to a host volume with the following command
minikube mount $HOME:/host
-
In the brxm-cms-site deployment I will add the mount, volume and the LUCENE_INDEX_FILE_PATH=/host/index.zip so that the container will use the existing index to start up the new pod/container
Snippet brxm-cms-site deployment yaml:
apiVersion: apps/v1
kind: Deployment
metadata:
name: brxm-cms-site
labels:
  app: brxm-cms-site
spec:
replicas: 2
selector:
  ...
template:
  metadata:
    ...
  spec:
    ...
    ..
    volumes:
      - name: host
        hostPath:
          # directory location on host
          path: /host
          # this field is optional
          type: Directory
    containers:
      - name: brxm-cms-site
        image: bloomreach/xm-example-k8s-project
        ports:
          - containerPort: 8080
        env:
          ...
          - name: LUCENE_INDEX_FILE_PATH
            value: /host/index.zip
        volumeMounts:
          - mountPath: /host
            name: host
        ...
-
In the newly started pod you should see the following logging, indicating that the index.zip is found and being extracted:
Extracting the lucene index export zip...
Archive:  /host/index.zip
  inflating: /brxm/project/target/storage/workspaces/default/index/_3/segments_1
  inflating: /brxm/project/target/storage/workspaces/default/index/_3/_0.cfs
  inflating: /brxm/project/target/storage/workspaces/default/index/_3/segments_2
  inflating: /brxm/project/target/storage/workspaces/default/index/_3/segments.gen
  inflating: /brxm/project/target/storage/workspaces/default/index/_2/segments_1
..........-
Want to know more or influence the behaviour? Check the following bash script which the behaviour is implemented: src/main/docker/scripts/docker-entrypoint.sh
...
# Unzip the lucene index export if it exists
if [[ -e "${LUCENE_INDEX_FILE_PATH}" ]]; then
echo "Extracting the lucene index export zip..."
mkdir -p ${REPO_PATH}/workspaces/default/index/
unzip ${LUCENE_INDEX_FILE_PATH} -d ${REPO_PATH}/workspaces/default/index/
fi
...
3. Scaling & Repository Maintenance
In the above examples we have done some scaling up. There are several key points you will need to take into account scaling a brxm application.
1. Experience manager and (detached) Frontend
When you scale up from 1 to multiple brxm-cms-site pods the channel manager will supply 2 additional query parameters to the frontend application.
-
token
-
server-id
These parameters are a hint for the frontend SDK to retrieve the preview Page Delivery API response from the same pod (stateful) that is loading the frontend application from within the channel manager.
You cannot access the Page Delivery API from a different pod in the preview context of the channel manager! This will result in an error.
In the live website, the backend and frontend can be completely stateless. It does not matter on which pod/container the Page Delivery API is being accessed.
To make sure that the frontend (within channel manager) accesses the correct pod/container, the server-id is used. The server-id query parameter needs to get converted to a SERVERID cookie sent towards the Page Delivery API. This will match the ingress session affinity rule in the above ingress example yaml. In the SDK you can configure/code that as following:
SSR:
https://github.com/bloomreach/brxm-k8s-102/blob/master/next/pages/%5B%5B...route%5D%5D.tsx
|
const serverId = query['server-id'] |
CSR:
https://github.com/bloomreach/brxm-k8s-102/blob/master/react/src/App.tsx
|
const serverId = new URLSearchParams(props.location.search).get('server-id'); |
2. Repository Maintenance
When a new brxm-cms-site pod is added to the cluster jackrabbit will register the new pod in the table REPOSITORY_LOCAL_REVISIONS for synchronization purposes.
When an brxm-cms-site pod is removed from the cluster, the entry in the REPOSITORY_LOCAL_REVISIONS is not removed for that node. This usually has to be done manually.
Example:
We start with the following REPOSITORY_LOCAL_REVISIONS
mysql> SELECT * FROM REPOSITORY_LOCAL_REVISIONS;
+----------------------------------------+-------------+
| JOURNAL_ID                             | REVISION_ID |
+----------------------------------------+-------------+
| _HIPPO_EXTERNAL_REPO_SYNC_index-backup |        1221 |
| brxm-cms-site-88d94c44f-dhd8r          |        1233 |
| brxm-cms-site-88d94c44f-jpt5v          |        1233 |
+----------------------------------------+-------------+
JOURNAL_ID column has an entry of 2 pods (ignore _HIPPO_EXTERNAL_*). Scale up to 3:
kubectl scale deployment/brxm-cms-site --replicas=3
JOURNAL_ID column has an entry of 3 pods :
+----------------------------------------+-------------+
| JOURNAL_ID                             | REVISION_ID |
+----------------------------------------+-------------+
| _HIPPO_EXTERNAL_REPO_SYNC_index-backup |        1221 |
| brxm-cms-site-88d94c44f-dhd8r          |        1233 |
| brxm-cms-site-88d94c44f-jpt5v          |        1233 |
| brxm-cms-site-88d94c44f-j47bs          |        1233 |
+----------------------------------------+-------------+
Scale down to 1:
kubectl scale deployment/brxm-cms-site --replicas=1
JOURNAL_ID column will still have an entry of 3 pods :
+----------------------------------------+-------------+
| JOURNAL_ID                             | REVISION_ID |
+----------------------------------------+-------------+
| _HIPPO_EXTERNAL_REPO_SYNC_index-backup |        1221 |
| brxm-cms-site-88d94c44f-dhd8r          |        1233 |
| brxm-cms-site-88d94c44f-jpt5v          |        1233 |
| brxm-cms-site-88d94c44f-j47bs          |        1233 |
+----------------------------------------+-------------+
To remove the entries from the JOURNAL_ID column have created the repo-maintainer cronjob:
First execute the setup of the service accounts:
|
bash repository-maintenance/setup-serviceaccount.sh |
Then run the repository maintainer (cron) job to clean up the table with unused JOURNAL_IDs
|
kubectl create -f cronjob-repository-maintenance.yaml |
The result is that the JOURNAL_IDs will be cleaned up
mysql> SELECT * FROM REPOSITORY_LOCAL_REVISIONS;
+----------------------------------------+-------------+
| JOURNAL_ID                             | REVISION_ID |
+----------------------------------------+-------------+
| _HIPPO_EXTERNAL_REPO_SYNC_index-backup |        1221 |
| brxm-cms-site-88d94c44f-dhd8r          |        1234 |
+----------------------------------------+-------------+
Other than the cleanup of the REPOSITORY_LOCAL_REVISIONS table the conjob will also execute 2 extra scripts for maintaining the repository in a healthy state. More: