Integrate Angular as a “multi-page app” into the Bloomreach Experience Manager (brXM) - Part 2: Implementation
Jan Pralle
2020-05-07
This article was originally published in German by Jan Pralle on https://diva-e.com/.
Part 2/2 of the blog series on website construction with Bloomreach
In the first part of the blog series on How To: Building websites with Bloomreach, the requirements, the application scenario and the architecture of an integration of Angular in the Bloomreach Experience Manager (brXM) were described. This approach enables a flexible combination of dynamic and “classic” pages if, for various reasons, it is not possible to implement a web application written entirely in Angular.

The architecture shows that different modules are integrated and loaded into the website via separate app selectors. In this part of the blog series, we will show how the implementation works. We will also show how these modules are delivered in separate "chunks" to increase page performance.

Pralle, J. Figure 1: Detailed architecture of the Angular integration, (2020). Diva-E, Retrieved from https://a.storyblok.com/f/67091/400x450/ded3ac88bf/visual-angular-3.png
In the first step, the Angular app has to be integrated into a suitable place in a brXM template. Almost, as usual, this is done with a special tag and JavaScript integration (see code snippet 1). However, we rename the <app-root> tag to "app-news-loader" . In this case, "News" is the name of the sub-app that is to be loaded here in the future as an Angular module. Each app module needs its own tag to be integrated into the brXM, otherwise, it will not be possible to determine which module should actually be loaded later in the Angular code. We integrate the second module "app-contact-loader" in a second FTL file (see code snippet 2). The integration on the brXM side is now complete.
Code snippet 1
<#include "../include/imports.ftl">

<h1>This is the news app module!</h1>
<app-news-loader></app-news-loader>

<@hst.link var="inlinejs" path="/js/angular/inline.bundle.js" />
<script type="text/javascript" src="${inlinejs}"></script>
<@hst.link var="polyfillsjs" path="/js/angular/polyfills.bundle.js" />
<script type="text/javascript" src="${polyfillsjs}"></script>
<@hst.link var="vendorjs" path="/js/angular/vendor.bundle.js" />
<script type="text/javascript" src="${vendorjs}"></script>
<@hst.link var="stylesjs" path="/js/angular/styles.bundle.js" />
<script type="text/javascript" src="${stylesjs}"></script>
<@hst.link var="mainjs" path="/js/angular/main.bundle.js" />
<script type="text/javascript" src="${mainjs}"></script>
Code snippet 2
<#include "../include/imports.ftl">

<h1>This is the contact app module!</h1>
<app-contact-loader></app-contact-loader>

<@hst.link var="inlinejs" path="/js/angular/inline.bundle.js" />
<script type="text/javascript" src="${inlinejs}"></script>
<@hst.link var="polyfillsjs" path="/js/angular/polyfills.bundle.js" />
<script type="text/javascript" src="${polyfillsjs}"></script>
<@hst.link var="vendorjs" path="/js/angular/vendor.bundle.js" />
<script type="text/javascript" src="${vendorjs}"></script>
<@hst.link var="stylesjs" path="/js/angular/styles.bundle.js" />
<script type="text/javascript" src="${stylesjs}"></script>
<@hst.link var="mainjs" path="/js/angular/main.bundle.js" />
<script type="text/javascript" src="${mainjs}"></script>
The main point of this approach is in app.module.ts (see code snippet 3). The section "provideRoutes" is important here, which createsroutes for the respective main modules of the two apps that we have integrated into the FTLs above. Contrary to the usual procedure for Angular routes, these routes only contain the module but no URL, which is why you cannot proceed as usual in this case. We do not add URLs because we don’t want Angular to manage the URL (see article part 1). However, we would like Angular to automatically generate the chunks for our app using a webpack. That is why we need the routes, and if another module is added, it can simply be configured as another route with its central module.
Code snippet 3
import {BrowserModule} from '@angular/platform-browser'
import {ApplicationRef, Inject, NgModule} from '@angular/core'

import {provideRoutes} from "@angular/router"
import {NewsLoaderComponent} from "./news-loader.component"
import {ContactLoaderComponent} from "./contact-loader.component"
import {DOCUMENT} from "@angular/common"

@NgModule({
  declarations: [
    NewsLoaderComponent,
    ContactLoaderComponent
  ],
  imports: [
    BrowserModule
  ],
  providers: [
    provideRoutes([
      {loadChildren : () => import('./news/news.module').then(m =>
m.NewsModule)}, // new dynamic import method
      {loadChildren : () => import('./contact/contact.module').then(m =>
m.ContactModule)}
    ])],
  entryComponents: [
    NewsLoaderComponent,
    ContactLoaderComponent
  ]
})
export class AppModule {
  private browser_document;

  constructor(@Inject(DOCUMENT) private document: any) {
    this.browser_document = document;
  }

  ngDoBootstrap(appRef: ApplicationRef) {

    if (this.browser_document.getElementsByTagName('app-news-loader').length > 0) {
      appRef.bootstrap(NewsLoaderComponent);
    }

    if (this.browser_document.getElementsByTagName('app-contact-loader').length > 0) {
      appRef.bootstrap(ContactLoaderComponent);
    }
  }
}
Another important point is the "ngDoBootstrap" method . Here, we check whether the HTML document from which the app is started contains a tag for the "News" or "Contact" app. Depending on which Tag was found, the corresponding component is loaded.
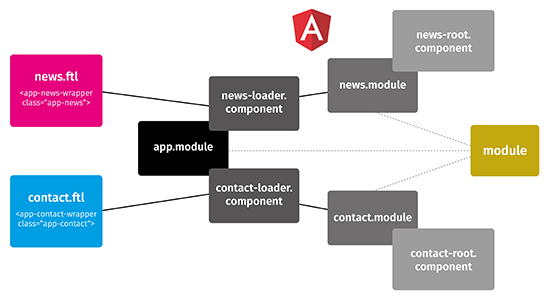
Internal Angular Architecture
The following image shows an overview of the internal architecture of the Angular app(s). The respective loader components are called directly in app.module.ts. From there, the modules named in the route are loaded (see code snippet 4). The only thing to note about the Loader class is that the correct selector is specified in the @Component area and the correct module is referenced in the "ngOnInit" method . This module then only references the actual RootComponent of the respective app as a kind of facade (see code snippet 5). The root component is then again a completely normal angular component with freedom of action, and can be seen in code listing 6 - but without any content.

Pralle, J. Figure 2: Extended detailed architecture of Angular integration, (2020). Diva-E, Retrieved from https://a.storyblok.com/f/67091/550x299/4b4f03f67c/bloomreach-ii-visual-ii.png
Code snippet 4
import {
  Compiler,
  Component,
  Injector,
  NgModuleFactory, NgModuleRef,
  OnInit,
  ViewChild,
  ViewContainerRef
} from '@angular/core'

export const lazyModule = {
  newsModule: {
    loadChildren:  () => import('./news/news.module').then(m => m.NewsModule)
  }
};

@Component({
  selector: 'app-news-loader',
  template: '<div #container></div>'
})

export class NewsLoaderComponent implements OnInit {

  @ViewChild('container', {static: true, read: ViewContainerRef}) container:
ViewContainerRef;

  private lazyModuleRef: NgModuleRef<any>

  constructor(private inj: Injector, private compiler: Compiler) {
  }


  ngOnInit() {

    const lazyModuleInjector = Injector.create({
      providers: [],
      parent: this.inj,
      name: 'lazyModuleProviders'
    });

    lazyModule.newsModule.loadChildren().then(moduleOrFactory => {
      if (moduleOrFactory instanceof NgModuleFactory) {
        return moduleOrFactory;
      } else {
        return this.compiler.compileModuleAsync(moduleOrFactory);
      }
    }).then((factory: NgModuleFactory<any>) => {
      this.lazyModuleRef = factory.create(lazyModuleInjector);
      const entryComponent = ( factory.moduleType as any).entry;
      const moduleRef = factory.create(this.inj);

      const compFactory =
moduleRef.componentFactoryResolver.resolveComponentFactory(entryComponent);

      this.container.createComponent(compFactory);
    });
  }
}
Code snippet 5
import { NgModule } from '@angular/core'
import { CommonModule } from '@angular/common'
import { NewsRootComponent } from './news-root/news-root.component'

@NgModule({
  imports: [
    CommonModule
  ],
  declarations: [NewsRootComponent],
  bootstrap: [NewsRootComponent]
})
export class NewsModule {
  static entry = NewsRootComponent
}
Code snippet 6
import { Component, OnInit } from '@angular/core'

@Component({
  selector: 'app-news-root',
  templateUrl: './news-root.component.html',
  styleUrls: ['./news-root.component.css']
})
export class NewsRootComponent implements OnInit {

  constructor() { }

  ngOnInit() {
  }

}
This completes the integration of the second Angular module. As can be seen in the architecture overview, shared parts of the Angular code can easily be referenced from both modules. Webpack then automatically takes care that this code is included in both app modules.
Maven integration
The Maven integration is implemented quickly. Simply create a Maven module with the pom.xml from code snippet 7 below the brXM main folder. This POM builds our app using the "frontend-maven-plugin" . For example, I assumed that the app is next to the brXM main folder under "angular-app" . The "maven-resources-plugin" then copies the results of the build into the "site" module, into the folder that is named for the JS files in the app1-main.ftl and app2-main.ftl.
The module must finally be added in the main POM of the project in the section "<profiles>" in the profile with the ID "default" under "<modules>" . If you now run a "mvn clean install" for brXM , the Angular app will be built automatically.
Code snippet 7
<?xml version="1.0" encoding="UTF-8"?>
<project xmlns="http://maven.apache.org/POM/4.0.0"
xmlns:xsi="http://www.w3.org/2001/XMLSchema-instance"
         xsi:schemaLocation="http://maven.apache.org/POM/4.0.0
http://maven.apache.org/maven-v4_0_0.xsd">
  <modelVersion>4.0.0</modelVersion>

  <parent>
    <groupId>com.diva-e</groupId>
    <artifactId>myangularhippo</artifactId>
    <version>0.1.0-SNAPSHOT</version>
  </parent>

  <name>Angular Frontend</name>
  <description>the Angular part of the my Angular Hippo project</description>
  <artifactId>myangularhippo-angular</artifactId>
  <packaging>pom</packaging>

  <properties>
    <frontend.maven.plugin.version>1.3</frontend.maven.plugin.version>
    <node.home.dir>${NODE_HOME}</node.home.dir>
    <node.version>v10.16.0</node.version>
    <npm.version>6.9.0</npm.version>
  </properties>

   <build>

    <plugins>
      <plugin>
        <groupId>com.github.eirslett</groupId>
        <artifactId>frontend-maven-plugin</artifactId>
        <version>${frontend.maven.plugin.version}</version>
        <configuration>
          <installDirectory>${node.home.dir}/..</installDirectory>
        </configuration>
        <executions>
          <execution>
            <id>install node and npm</id>
            <goals>
<goal>install-node-and-npm</goal>
            </goals>
            <configuration>
              <nodeVersion>${node.version}</nodeVersion>
              <npmVersion>${npm.version}</npmVersion>
            </configuration>
          </execution>
          <execution>
            <id>npm install angular-app</id>
            <goals>
              <goal>npm</goal>
            </goals>
            <configuration>
              <workingDirectory>../../angular-app/</workingDirectory>
              <arguments>install</arguments>
            </configuration>
          </execution>
          <execution>
            <id>npm build angular-app</id>
            <goals>
              <goal>npm</goal>
            </goals>
            <configuration>
              <workingDirectory>../../angular-app/</workingDirectory>
              <arguments>run-script build-prod</arguments>
            </configuration>
          </execution>
        </executions>
      </plugin>

      <plugin>
        <artifactId>maven-resources-plugin</artifactId>
        <version>2.7</version>
        <executions>
          <execution>
            <id>copy angular binaries</id>
            <phase>install</phase>
            <goals>
              <goal>copy-resources</goal>
            </goals>

            <configuration>
              <outputDirectory>${basedir}/../site/src/main/webapp/js/angular/</outputDirectory>
              <resources>
                <resource>
                  <directory>${basedir}/../../angular-app/dist/</directory>
                  <includes>
                    <include>*.js</include>
                  </includes>
                </resource>
              </resources>
            </configuration>
          </execution>
        </executions>
      </plugin>
    </plugins>

  </build>
</project>
Conclusion
Integrating Angular in brXM in this way may seem like a hack at first, but our approach shows that it is possible without much detours and with relatively normal means. We originally designed this solution for Angular 2 and have carried it over to Angular 8 without any problems. So you can bridge the gap between “old-school JSP ” and the dynamic Angular world. We hope that our How-To: website construction with Bloomreach will make the work in one or the other project easier.
The entire project with the complete, executable sample code can be found here .