Creating your first AngularJS app with Hippo CMS
Jeroen Reijn
2015-01-08
Over the last year or so, I've seen an increase in teams exploring ways of integrating CMSs in combination with Single Page Applications (SPA). Single page applications and CMSs are not always a natural fit because of the page-oriented nature of some Content Management Systems. Hippo CMS, with its strong focus on separation of content and presentation and its content/document-oriented approach, is, however, a good match when it comes to providing content to any type of application. In this post, we'll explore how we can create our own little AngularJS microsite, which will be consuming content coming from a Hippo CMS REST service.
The demo website
Our little microsite will show products and detailed product information managed from within Hippo CMS. In this case products are just an example of a type of content which can be managed with Hippo CMS. Hippo has a very flexible content model and allows you to define your own content types straight from within the Hippo CMS user interface. You can create and store any type of content within the CMS and expose that content via a Hippo REST API endpoint without much effort. This makes Hippo CMS very suitable to use in a Content as a Service (CaaS) type of scenario. Creating a REST API with Hippo CMS is worth a topic of its own, so we'll talk about that in a different post. For this post we'll focus on the AngularJS part of the story and we will use the available Hippo CMS RESTful APIs, which are is deployed with the Hippo CMS online demo installation. The demo CMS contains two RESTful endpoints at the moment. Further information about the API can be found on the demo REST page.
Setting up the project
Let' first start with a basic HTML5 template called demo.html and let's use Bootstrap 3 for the styling of our little site.
<!doctype html>

<html>

<head>

    <meta charset="UTF-8">

    <link rel="stylesheet" href="https://maxcdn.bootstrapcdn.com/bootstrap/3.3.1/css/bootstrap.min.css">

    <link rel="stylesheet" href="demo.css">

    <script src="https://ajax.googleapis.com/ajax/libs/angularjs/1.3.8/angular.min.js"></script>

    <script src="https://ajax.googleapis.com/ajax/libs/angularjs/1.3.8/angular-resource.min.js"></script>

    <script src="https://ajax.googleapis.com/ajax/libs/angularjs/1.3.8/angular-route.min.js"></script>

    <script src="https://ajax.googleapis.com/ajax/libs/angularjs/1.3.8/angular-sanitize.min.js"></script>

    <script src="demo.js"></script>

</head>

<body ng-app="productsApp">

  ...

</body>

</html>
To let AngularJS auto-bootstrap our application, we've added the ng-app directive with the value productsApp as an attribute to the body element. This way the AngularJS application will be automatically launched as soon as the browser finishes loading all the resources.
Creating the application
For our AngularJS application code we'll create a file called ```demo.js``` and start out with the definition of our application.
var productsApp = angular.module('productsApp', ['ngRoute', 'ngResource','ngSanitize']);We give the application a name (productsApp like we did in the HTML template) and specify the Angular modules which we would like to use in our application. In our case we use the following modules:
- ngRoute - provides routing and deeplinking services
- ngResource - provides interaction support with RESTful services
- ngSanitize - provides functionality to sanitize HTML
Because we will reuse the webservice URL in several locations of our application we'll define it as a constant.
productsApp.constant('apiPrefix', 'http://www.demo.onehippo.com/restapi/');Add some routing
Now that our application is defined, let's get to the actual coding part and create two routes that represent our homeand detail page for our products.
Since we are making a single page application and we don’t want any page refreshes, we’ll use Angular’s routing capabilities. We will be using $routeProvider in Angular to handle our routing. This way, Angular will handle all of the magic required to go get a new file and inject it into our layout. We'll define two routes both handled by the same controller and use a different template to present the content. I could have chosen to create a separate controller for the detail page, but because this is a small demo I think it's not worth it scattering the logic.
productsApp.config(function($routeProvider) {

    $routeProvider

            .when('/', {

                templateUrl:'product-list.html',

                controller:'ProductsController'

            })

            .when('/:path*', {

                templateUrl: 'detail.html',

                controller: 'ProductsController'

            })

            .otherwise('/');

});
Because we're using the ngRoute module we will have to add the ng-view directive to our template, so that AngularJS knows where to place the actual content of the view itself.
<body ng-app="productsApp">

  <div class="container">

      <div ng-view></div>

  </div>

</body>
Let's create some views
For the homepage we want to create an overview of the top products coming from the topproducts endpoint. The response coming from the topproducts endpoint will be something like:
[

    {

        "name": "organic-cotton-reusable-lunch-bag",

        "localizedName": "Organic Cotton Reusable Lunch Bag",

        "path": "/content/documents/hippogogreen/products/food/2010/07/organic-cotton-reusable-lunch-bag/organic-cotton-reusable-lunch-bag",

        "primaryNodeTypeName": "hippogogreen:product",

        "links": [

            {

                "Link": {

                    "rel": "http://www.onehippo.org/cms7/hst/rest/relations/mount:rest",

                    "type": null,

                    "href": "http://www.demo.onehippo.com/restapi/products/food/2010/07/organic-cotton-reusable-lunch-bag",

                    "title": "Organic Cotton Reusable Lunch Bag"

                }

            }

        ],

        "canonicalHandleUuid": "8454b2df-d1ec-48ec-8556-81bd535acbb2",

        "price": 34,

        "rating": 5,

        "smallThumbnail": "http://www.demo.onehippo.com/binaries/smallthumbnail/content/gallery/products/2010/06/organic-lunch-bag.jpg"

    }

]
Now that we know the backing data model, we can start creating the template for the overview.
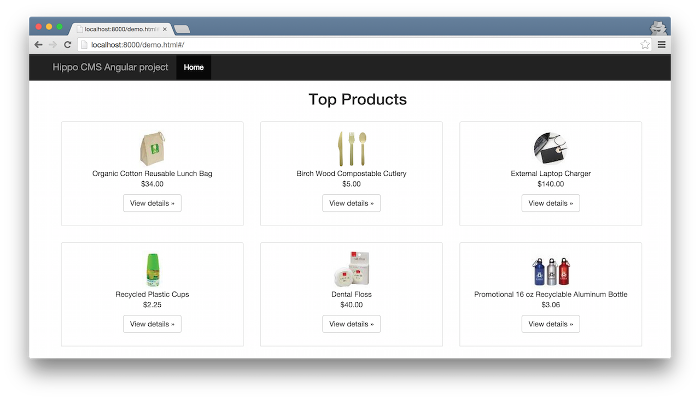
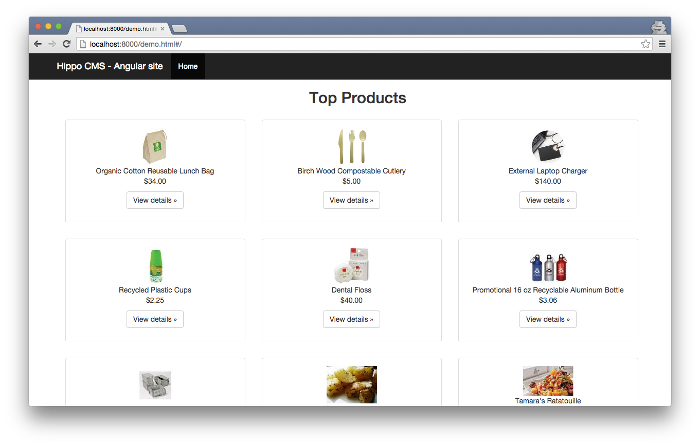
For each product I want to show a small thumbnail, the name, the price and link to the detail page for further information. When a user clicks on the "View details" button I want the application to switch to the product information view.
Let's start out with the actual html fragment used for showing the list of products.
<div class="container products">

    <h2>Top Products</h2>

    <div class="row">

        <div class="col-md-4 tile" ng-repeat="product in products">

            <img src="{{product.smallThumbnail}}"/>

            <div>

                {{product.localizedName}}

            </div>

            <p class="price-label">{{product.price | currency:"$"}}</p>

            <p><span class="btn btn-default" role="button" ng-click="showProduct(product)">View details »</span></p>

        </div>

    </div>

</div>
As you can see the template is quite simple and just iterates through the Angular Model object called products.
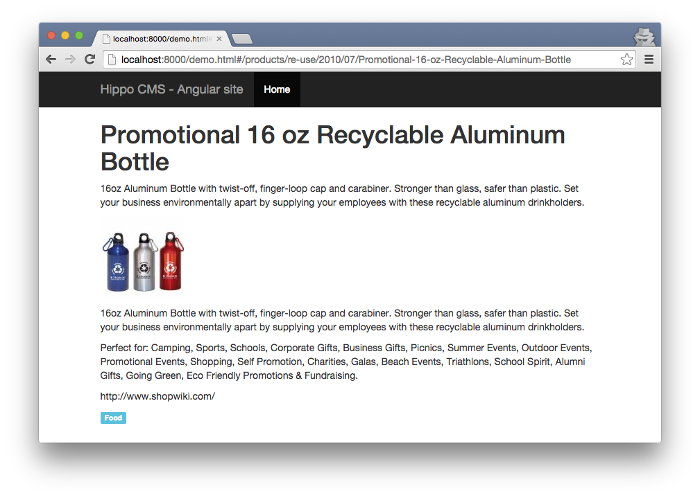
For the detail view we would like to show the following fields:
- title
- summary
- large image
- description
- tagged categories
Let's create a new file which we'll call detail.html for our detail view.
<div>

    <h1>{{product.title}}</h1>

    <p>{{product.summary}}</p>

    <p><img src="{{product.image}}"></p>

    <div ng-bind-html="product.description"></div>

    <div>

        <span class="label label-info" ng-repeat="category in product.categories">{{category}}</span>

    </div>

</div>
Now we're done with the visual implementation of our small products website. If we would browse to the site we would only see an empty homepage, because we've not created our controller yet, so let's move on to the actual interaction and logic of our application.
![]()
Getting data from the webservice
To abstract all interactions with the webservice API we'll create a ProductService which will communicate with the backend service for us. In this scenario we will use the AngularJS $resource service instead of the lower level $http service for doing the actual communication. Because we have only two ways of showing the data (list and product detail) our ProductsService will have two functions:
- Getting the list of top products via a query on the topproducts resource
- Getting the detail information of one specific product
productsApp.factory('ProductsService', function($resource, apiPrefix) {

    return {

        getList: function() {

            return $resource(apiPrefix + 'topproducts', {'_type': 'json'}).query();

        },

        getProductByPath: function(path) {

            return $resource(apiPrefix + path, {'_type': 'json'}).get();

        }

    }

});
In most of the AngularJS tutorials I see a numerical ID of an object used within the application and URL for further reference, but since we're fond of nice and SEO friendly looking URL's here at Hippo I've chosen to use the relative path of the document instead.
Wiring things together
Now in the final step of our demo application we will need to wire all of the above together by creating our Angular controller called ProductsController, which will handle most of the actual logic of binding the data to the view for us.
Let's first add the ProductsController to an element in our template.
<body ng-app="productsApp">

  <div class="container" ng-controller="ProductsController">

      <div ng-view></div>

  </div>

</body>
Now in our controller we will need to handle two things:
- Getting the list of top products from the service in case we're at the homepage or getting the individual product document when we click on the view detail 'button'.
- Switching to the detail page when we click on a product
productsApp.controller('ProductsController', function ($scope, $location, $routeParams, ProductsService, apiPrefix) {

    if(!$routeParams.path) {

        $scope.products = ProductsService.getList();

    } else {

        $scope.product = ProductsService.getProductByPath($routeParams.path);

    }


    $scope.showProduct = function (product) {

        if (product['links']) {

            var productByUrl = product['links'][0]['Link'].href;

            var shortUrl = productByUrl.substr(apiPrefix.length)

            return $location.path(shortUrl);

        }

    }

});
Well that's it. Now we have a working project showing a list of products and a detail page which shows the detail information about the product.
Conclusion
This was a very simple tutorial on how to create an AngularJS based application which leverages content coming from a CMS. Some of the basic topics of how to use the AngularJS framework have been shown, but there is much more to learn. The code and a working demo project are available on Github in the 'simple angular' demo tree. If anyone has any suggestions for future AngularJS + Hippo CMS articles or different ways to do what we’ve just done here let me know via a comment. In order to find out more about a new approach to Single-Page Applications (SPA) click here.